[et_pb_section fb_built=”1″ admin_label=”section” _builder_version=”4.16″ global_colors_info=”{}” theme_builder_area=”post_content”][et_pb_row admin_label=”row” _builder_version=”4.16″ background_size=”initial” background_position=”top_left” background_repeat=”repeat” global_colors_info=”{}” theme_builder_area=”post_content”][et_pb_column type=”4_4″ _builder_version=”4.16″ custom_padding=”|||” global_colors_info=”{}” custom_padding__hover=”|||” theme_builder_area=”post_content”][et_pb_text admin_label=”Text” _builder_version=”4.16″ background_size=”initial” background_position=”top_left” background_repeat=”repeat” hover_enabled=”0″ global_colors_info=”{}” theme_builder_area=”post_content” sticky_enabled=”0″]
Overview of LinkedIn Sales Navigator
When it comes to building connections and nurturing leads, navigating the vast ocean of LinkedIn can be a daunting task. That’s where LinkedIn Sales Navigator comes into play. It’s an essential tool tailored to elevate your sales efforts through targeting, engagement, and insights.
What is LinkedIn Sales Navigator?
LinkedIn Sales Navigator is a premium subscription service specifically crafted for sales professionals. Imagine having a specialized toolkit that not only enhances your ability to find prospects but also empowers you to engage with them effectively and meaningfully.
Sales Navigator provides advanced search capabilities, allowing you to filter potential leads based on various criteria such as company size, industry, job title, and more. This tool integrates seamlessly into the LinkedIn platform, ensuring a familiar environment as you delve deeper into your sales strategies.
By utilizing Sales Navigator, you can:
- Access tailored lead recommendations.
- Use real-time insights about your accounts and leads.
- Track changes in your network to identify opportunities.
- Save and manage leads for streamlined follow-ups.
In essence, it gives you the ability to qualify prospects with precision, enabling a more strategic approach to your sales process.
Benefits of Using LinkedIn Sales Navigator
Opting for LinkedIn Sales Navigator allows you to reap a multitude of benefits that can directly enhance your sales performance. Here’s what you can expect:
- Enhanced Targeting: With powerful filters, you can zero in on the exact companies or individuals that fit your ideal customer profile. Searching via specific criteria allows for precision targeting.
- Lead Recommendations: The platform uses smart algorithms to suggest relevant leads based on your previous interactions, helping you discover potential clients you may not have considered otherwise.
- Engagement Insights: You’ll receive updates on your leads’ activity, whether they’re changing jobs or sharing new content. This helps you engage at the right moments and personalize your outreach.
- CRM Integration: seamless integration with popular customer relationship management (CRM) systems streamlines your workflow, allowing for easy data transfer and lead tracking.
- InMail Messaging: With InMail, you can connect with prospects even if you’re not a direct connection, maximizing outreach opportunities.
As a sales manager, utilizing these benefits not only drives efficiency but also encourages your team to work smarter, not harder.
Target Audience for LinkedIn Sales Navigator
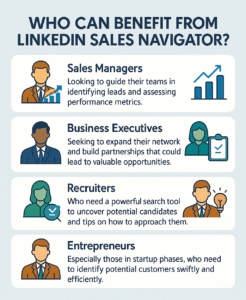
LinkedIn Sales Navigator is specifically designed for those in sales roles, but it can also be advantageous for marketing and business development professionals. The following groups can significantly benefit from its features:
Sales Managers: Looking to guide their teams in identifying leads and assessing performance metrics.
Business Executives: Seeking to expand their network and build partnerships that could lead to valuable opportunities.
Recruiters: Who need a powerful search tool to uncover potential candidates and tips on how to approach them.
Entrepreneurs: Especially those in startup phases, who need to identify potential customers swiftly and efficiently.
For example, imagine a sales manager overseeing a team of ten. By equipping them all with Sales Navigator, the manager can not only monitor lead engagement but also drive collective strategies that leverage their networks more effectively. The insights drawn from this tool can foster informed conversations and lead to stronger business relationships.
In conclusion, LinkedIn Sales Navigator isn’t just a rehash of traditional networking; it’s a dynamic platform that tailors your approach to sales and engagement. By understanding its functionality and recognizing its intended audience, you’ll be better equipped to thrive in today’s competitive landscape.
Setting Up Your LinkedIn Sales Navigator Account
Once you’ve grasped the immense value that LinkedIn Sales Navigator offers, the next step is to ensure your account is set up correctly. The process is straightforward, but taking the time to do it right can unlock the full potential of the tool. Let’s break it down into three manageable components: creating an account, navigating the dashboard, and customizing your account settings.
Creating an Account
Creating your LinkedIn Sales Navigator account is the first step to leveraging its features. If you already have a LinkedIn profile, you’re halfway there! Here’s how to get started:
- Sign In to LinkedIn: Begin by logging into your existing LinkedIn account; if you don’t have one, you’ll need to create it first.
- Navigate to Sales Navigator: You can find the Sales Navigator option either from the LinkedIn homepage or by visiting linkedin.com/sales/navigator.
- Choose a Subscription Plan: LinkedIn offers several subscription plans tailored to different business needs. Select the plan that best fits your requirements—whether you’re an individual salesperson or managing a larger team. It’s often worth taking full advantage of any trial period offered.
- Input Your Information: You’ll need to fill in some basic settings, including industry-specific data, your sales goals, and customer preferences. This helps Sales Navigator to tailor its recommendations to suit your needs.
- Finalize Your Account Setup: Follow any remaining prompts, and you’re all set! Don’t forget to explore the introductory tutorial that explains the platform’s functionality.
Taking these steps ensures that your journey with Sales Navigator starts on the right foot. If you’ve ever created an account on a new platform, you know that the initial setup is key to accessing all the features efficiently.
Navigating the Dashboard
After successfully setting up your account, it’s time to familiarize yourself with the Sales Navigator dashboard. Consider the dashboard as your control center; everything you need to manage leads and analyze results is conveniently located here.
Home Feed: The dashboard includes a personalized home feed that shows updates from saved leads and accounts. This helps you stay informed on potential opportunities at a glance.
Lead Builder: This tool allows you to conduct advanced searches. You can apply various filters here to zero in on your target audience—think of it as the powerhouse for your prospecting efforts.
Message Center: This is where you manage all your InMail communications. You have a dedicated space for your messages, making it easy to track outreach and responses.
Account Insights: Here, you can view a comprehensive overview of your accounts, including any recent changes or important news, helping you tailor your approach when reaching out to prospects.
Navigating smoothly through your dashboard sets the stage for productive sales efforts. The more comfortable you become with these various sections, the more effective your engagement strategies will be.
Customizing Your Account Settings
Once you’ve explored the dashboard, take some time to customize your account settings. Doing so helps the platform work better for you. Here’s how:
- Profile Preferences: Tailor what information you want to display on your profile to meet your sales goals. Ensure your profile resonates with your target audience by aligning it with their needs.
- Email Notifications: Adjust your notification settings to receive updates that matter most to you. You can choose to be alerted about lead activity, account updates, and more.
- Integration Options: If you use a CRM, linking it with Sales Navigator will streamline your operations. Explore the settings to set up this integration.
- Privacy Settings: Adjust your privacy settings according to your comfort level. For example, you may want to restrict others from seeing your activity on the platform to protect your strategies.
For instance, I recall customizing my notification preferences and was able to filter out unnecessary alerts. This change allowed me to focus on high-priority leads without getting sidetracked by less relevant updates.
By taking the time to set up your LinkedIn Sales Navigator account properly, you maximize its potential to transform your sales process. With your account created, dashboard navigated, and settings customized, you’re now ready to dive into the advanced features that will help drive your sales success.
Advanced Search Techniques on LinkedIn Sales Navigator
Now that you have your LinkedIn Sales Navigator account set up and customized, it’s time to move to one of the most powerful features of the platform: advanced search techniques. Mastering these techniques allows you to fine-tune your prospecting efforts, ensuring you connect with the right people at the right time. In this section, we’ll explore how to use filters for targeted searches, save search preferences for future use, and utilize Boolean operators to refine your search results.
Using Filters for Targeted Searches
Filters are your best friend when it comes to narrowing down search results in Sales Navigator. The platform offers a comprehensive suite of filters that allow you to define your ideal prospects with precision. Here’s how to make the most out of them:
Industry: Select the specific industries that align with your solutions. This is particularly useful if your product or service caters to niche markets.
Location: Narrow your search by geographic region. Whether it’s local, national, or global outreach, selecting a relevant location helps you prioritize leads that are attainable.
Seniority Level: Choose the seniority level of the prospects you wish to target. You may want to focus on decision-makers or, alternatively, individuals at specific stages in their careers.
Company Size: Filter by company size to target your ideal client. Whether you’re after startups or established enterprises, defining this criterion ensures alignment with your offerings.
Function and Title: This allows pinpointing your prospect’s role in the organization. If you’re looking to connect with the marketing head, for example, using the function or title filter will help you find the right individuals quickly.
Utilizing these filters can drastically enhance the quality of your leads. When I began using filters, I had a revelation. Instead of sending generic outreach, I started to focus on a specific segment—resulting in meaningful conversations and, ultimately, closed deals.
Saving Search Preferences
After crafting an effective search using filters, the next step is to save those search preferences for future use. This not only saves time but also keeps you aligned with your ongoing sales goals. Here’s how:
- Perform a Search: Start with a targeted search using the filters mentioned earlier.
- Save the Search: After generating your desired results, look for the “Save Search” button usually located at the top of your results. This option allows you to easily revisit this search anytime without having to re-enter your filters.
- Set Up Alerts: After saving the search, you can opt to receive alerts when new leads match your specified criteria. This feature keeps your pipeline full, making it easier to stay proactive rather than reactive.
- Organize Searches: Consider creating multiple saved searches for different segments of your target audience, enabling you to manage various outreach campaigns effectively.
For instance, I maintain separate saved searches for different industries and job titles, allowing me to tailor my messaging per segment. This organizational technique has significantly improved my outreach strategies, as I’m always equipped with a fresh list of leads.
Utilizing Boolean Operators
If you’re aiming for even greater precision, learning to use Boolean operators is key. These operators help to refine your searches beyond standard filters. Here’s how to wield them effectively:
- AND: Ensures that both terms are included in the search. For example, searching for “marketing AND manager” will yield results that include both keywords.
- OR: Broadens your search to include results that feature either term. If you search “sales OR business development,” you’ll receive results that encompass roles falling under either category.
- NOT: This operator allows you to exclude specific terms from your search, refining your results. Searching for “engineer NOT software” would bring up engineering roles without including those focused specifically on software.
- Quotations: When searching for a specific phrase, using quotations can refine results further. Searching for “client relationship manager” will yield results containing that exact phrase rather than separate instances of the words.
- Parentheses: By using parentheses, you can group different search components. For example, searching for “(sales OR marketing) AND (manager OR director)” will bring results that match any of the variables within the parentheses.
In my experience, mastering these Boolean techniques transformed how I approached my searches. I was able to uncover hidden gems in my prospecting efforts that would’ve otherwise slipped through the cracks.
By effectively employing these advanced search techniques—utilizing filters, saving preferences, and using Boolean operators—you can ensure that your prospecting efforts are not only efficient but also highly effective. With this knowledge in hand, you’re now equipped to navigate the depths of LinkedIn Sales Navigator like a pro!
Building and Managing Prospect Lists
With your advanced search techniques under your belt, it’s time to dive into building and managing your prospect lists. A critical aspect of leveraging LinkedIn Sales Navigator effectively revolves around organizing and keeping track of your leads and accounts. Let’s explore how to create saved leads and accounts, organize them with tags and notes, and track lead activity to ensure no opportunity slips through the cracks.
Creating Saved Leads and Accounts
Building a robust prospect list starts with saving leads and accounts that align with your sales goals. Here’s how to streamline this process:
- Identify Potential Leads: Using the advanced search techniques we discussed, start identifying leads that suit your targeted criteria. Whether it’s by job title, industry, or company size, you can zero in on your ideal prospects effectively.
- Save Leads: Once you identify a prospect worth pursuing, simply click on the “Save” button next to their profile. This action adds them to your “Saved Leads” list, allowing easy access in the future.
- Save Accounts: Similarly, if a company stands out as a promising opportunity, you can save the entire account. By clicking on “Save,” the company becomes part of your “Saved Accounts,” helping you monitor its updates and news.
- Create Lists: For better management, consider segmenting your saved leads into different lists based on criteria like priority, industry, or stage in the sales process. This approach keeps your outreach organized and targeted.
For example, when I first started saving leads, I would create different lists for various product lines we offered. Over time, I found it helped me tailor my messaging to meet each lead’s needs better—ultimately improving my response rates!
Organizing Leads with Tags and Notes
Now that you have a collection of saved leads and accounts, efficiently managing them becomes crucial. This is where tags and notes come into play.
Using Tags: Tags allow you to categorize your leads based on specific attributes or actions you want to remember. You can create custom tags such as “Warm Lead,” “Follow Up,” or “Interested in Demo.”
-
- To add a tag, go to the profile of the saved lead, locate the tagging section, and enter your custom label.
- Use tags consistently to ensure you can easily filter through leads later.
Adding Notes: While tags provide a quick reference, notes allow for a deeper dive into your interactions with prospects. Keep track of important details like previous conversations, lead interests, or specific follow-up dates.
-
- To add a note, visit the lead’s profile and type your insights directly into the notes section.
- Make it a habit to jot down details after each interaction; this can make your follow-ups much more personal and relevant.
I remember a time when I added detailed notes on a lead that mentioned they were transitioning their marketing strategy. When I reached out weeks later, referencing this context made the conversation richer and sent my credibility soaring.
Tracking Lead Activity
To ensure you stay on top of nurturing your leads, tracking their activity is paramount. LinkedIn Sales Navigator offers valuable insights to help you monitor how your prospects engage with content and each other.
- Activity Updates: Regularly check the activity updates for your saved leads. Sales Navigator provides real-time notifications when your prospects post updates, change jobs, or interact with content.
- Engagement Monitoring: When you see a lead sharing an article or commenting on a post, it’s a great opportunity to engage. You can share the same article or express your insight into whatever they commented on, thereby strengthening your relationship.
- Setting Reminders: If you have specific follow-up dates in mind based on previous engagements, set reminders for yourself. Whether it’s a week or a month, setting timely notifications ensures you never miss an opportunity.
- Review Performance: Periodically review which leads have the most activity and engagement. These insights can help you prioritize who to reach out to next, maximizing your chance of conversion.
Using these tracking features has noticeably changed how I manage my sales pipeline. It’s allowed me to be more proactive rather than reactive, helping me turn potential leads into significant customers.
In summary, building and managing your prospect lists is a multifaceted process that includes creating saved leads and accounts, organizing with tags and notes, and keenly tracking lead activity. Mastering these elements within LinkedIn Sales Navigator will not only streamline your workflow but also elevate your overall sales strategy significantly.
Engaging with Leads on LinkedIn
Having built a robust prospect list and managed it efficiently, the next vital step in your sales strategy is engaging with your leads. Active engagement not only helps to cultivate relationships but also builds trust and credibility over time. In this section, we’ll explore how to send personalized connection requests, craft effective InMail messages, and engage meaningfully with content and comments.
Sending Personalized Connection Requests
The first interaction you have with a lead often starts with a connection request. Sending a generic request can lead to missed opportunities, while a personalized approach can significantly increase your chances of acceptance. Here’s how to make your connection requests stand out:
- Do Your Homework: Before reaching out, take a moment to review the prospect’s profile. Look for common connections, shared interests, or mutual groups. This background information can provide you with valuable talking points.
- Be Specific: Instead of sending “I’d like to add you to my network,” tailor your message. Mention why you want to connect. For example, “Hi [Name], I noticed we both attended [Event/Conference]—I’d love to connect and share insights about [Specific Topic].”
- Keep It Short and Sweet: Busy professionals may not have time to read lengthy messages. Aim for a few sentences that convey your value proposition or commonality.
- Follow Up: If they accept your request, don’t stop there. Send a “thank you” message and perhaps mention a relevant article or resource related to their interests.
When I began personalizing my connection requests, the results were staggering. I saw my acceptance rate triple! By demonstrating genuine interest in my prospects, I built a foundation for authentic relationships.
Crafting Effective InMail Messages
Once you’ve connected with leads, the next step is often using InMail to facilitate deeper conversations. InMail can be a powerful tool if done correctly. Here are some tips to ensure your messages resonate:
- Personalize Your InMail: Similar to connection requests, personalizing your InMail is essential. Start with the lead’s name and reference any common ground or mutual interests.
- Get to the Point: Busy professionals appreciate brevity. Clearly articulate your purpose within the first few lines. For instance, “I noticed you’re involved with [specific project], and I’d love to discuss how [your solution] could support that initiative.”
- Offer Value: Make sure to provide something of value in your message—a useful link, an insight related to their industry, or an invitation to a webinar that could benefit them.
- Include a Clear Call to Action: Always end your InMail with a specific request, whether it’s to schedule a call, attend an event, or download a resource. For example, “Are you open to a chat next week to explore this further?”
I recall a time when I reached out to a lead with a personalized InMail offering free insights into their industry trends. This not only opened a dialogue but eventually led to a partnership that I wouldn’t have secured with a generic message.
Engaging with Content and Comments
Engagement doesn’t stop at sending requests and InMails. Actively interacting with the content your leads share can position you as a thought leader and deepen your relationship. Here’s how to do it effectively:
- Share Relevant Content: If you come across articles, studies, or posts that would interest your leads, share them directly in your messages or on your own profile and tag them. This shows you’re thinking of their interests.
- Comment Thoughtfully: Whenever your leads post content, take the time to comment with meaningful insights rather than a generic “Great post!” Share your perspective or ask questions to foster deeper discussions.
- Engage in Groups: Join LinkedIn groups your leads are part of and contribute to discussions. Sharing your knowledge can enhance your visibility and establish your expertise.
- Celebrate Their Success: Notice achievements, promotions, or anniversaries in your lead’s career, and congratulate them. This small gesture can leave a lasting impression.
I remember engaging with a lead’s article and providing my insights on their topic. This interaction led to them reaching out for a discussion, eventually resulting in a collaborative project!
In conclusion, engaging with leads on LinkedIn is a vital component of nurturing relationships that lead to successful sales. Personalizing your connection requests and InMail messages, along with consistent engagement with content and discussions, will not only enhance your credibility but also turn leads into loyal clients over time. With these strategies, you’re poised to make meaningful connections that drive your success in the sales landscape.
Leveraging TeamLink and CRM Integration
As you continue to build and engage with your leads on LinkedIn, the next step is maximizing the effectiveness of your sales efforts through collaborative tools like TeamLink and integrating with CRM systems. These features not only streamline your processes but also enhance teamwork and fine-tune your outreach strategies. Let’s dive into how you can leverage these tools effectively.
Collaborating with TeamLink
TeamLink is a feature within LinkedIn Sales Navigator that enables you to tap into your organization’s collective network. This means you can gain access to connections that your colleagues have, effectively expanding your reach without additional effort. Here’s how to utilize TeamLink to foster collaboration:
- Identify Warm Introductions: Use TeamLink to see if any of your colleagues are connected to your leads. This visibility can pave the way for warm introductions, allowing you to reach prospects through mutual contacts.
- Coordinate Your Efforts: When multiple team members are reaching out to similar leads, TeamLink allows for better coordination. You can avoid overlapping efforts, ensuring that your outreach is more strategic and unified.
- Share Insights: Collaborate with your team by sharing notes or insights gained from interactions. This information can help others understand the lead better, keeping everyone on the same page.
- Leverage Collective Knowledge: When strategizing on how to approach particular leads, tap into your colleagues’ experiences and successes. This collective knowledge can offer invaluable insights that can shape your approach.
Utilizing TeamLink has personally transformed how my team approaches networking. Our shared connections have led to numerous successful introductions, making our outreach much more effective than it ever was before.
Integrating Sales Navigator with CRM Systems
Integrating LinkedIn Sales Navigator with your existing CRM system is an essential step for optimizing your sales workflow. Many organizations use CRMs to track interactions with clients and manage their sales pipeline. Here’s how you can integrate the two for a seamless experience:
- Syncing Data: By connecting Sales Navigator with your CRM (like Salesforce or HubSpot), you can sync lead and account information automatically. This ensures that you have up-to-date records without double entry.
- Tracking Engagement: Integrated systems allow you to track interactions and note any important conversations directly in your CRM. This capability provides a comprehensive view of your relationship with each lead.
- Gaining Insights: When Sales Navigator’s insights feed into your CRM, you gain deeper visibility into lead activity. You can see when prospects interact with your content or share updates, allowing for timely follow-ups.
- Streamlining Workflows: Integration helps automate workflows, like setting reminders, logging activities, and scheduling follow-ups. This efficiency can significantly increase your team’s productivity.
When I integrated Sales Navigator with our CRM, I was amazed at how much time we saved on administrative tasks. The automatic logging of conversations and the ability to monitor lead activity transformed our tracking process, enabling us to focus more on building relationships rather than managing data.
Maximizing Collaboration and Efficiency
By leveraging TeamLink and integrating with CRM systems, you open up pathways to not only improve individual performance but also enhance team collaboration significantly. Here are some best practices to maximize both collaboration and efficiency:
- Regular Training: Ensure your team is well-versed in utilizing TeamLink and CRM features. Conduct regular training sessions to keep everyone updated on best practices.
- Encourage Transparency: Foster a culture where team members share insights and progress on leads. Transparency can help identify where resources can be focused for maximum impact.
- Define Roles Clearly: Make sure everyone understands their roles concerning TeamLink and CRM usage to avoid overlap. This can help streamline interactions with leads.
- Solicit Feedback: Encourage team members to provide feedback on the integration and the collaborative processes. Continuous improvement is key to achieving optimal efficiency.
- Set Shared Goals: Align team goals with collaborative efforts. When everyone is working toward the same objectives, using tools like TeamLink becomes even more effective.
Personal anecdote: My team initiated a strategy alignment meeting after integrating these tools, and it was a game-changer. By defining clear objectives together while using TeamLink insights, we turned our leads into customers much faster than before.
In conclusion, leveraging TeamLink and integrating Sales Navigator with your CRM can significantly boost your sales effectiveness. By fostering collaboration and efficiency, you not only streamline your processes but also create an environment ripe for success. Embracing these tools will undoubtedly transform how you and your team engage with leads, paving the way for greater growth and success in your sales endeavors.
Analyzing Performance and Metrics
Having established effective strategies for engagement through TeamLink and CRM integration, the next critical step in your sales process is analyzing performance and metrics. Understanding how your efforts translate into results is vital in optimizing your outreach and refining your sales tactics. In this section, we’ll delve into how to track InMail and connection request acceptance rates, measure your Social Selling Index (SSI) score, and utilize Sales Navigator’s reporting tools to your advantage.
Tracking InMail and Connection Request Acceptance
The first metric you should monitor closely is the acceptance rate of your connection requests and the effectiveness of your InMail messages. These metrics give direct insight into how well your outreach strategies resonate with your audience.
Connection Request Acceptance Rate: LinkedIn provides you with insights into how many of your connection requests are accepted versus sent. A higher acceptance rate often indicates that you’re successfully personalizing your requests and connecting with the right audience.
Calculate Your Rate: To determine your rate, divide the number of accepted requests by the total sent, and multiply by 100. For example, if you sent 50 requests and 30 were accepted, your acceptance rate would be 60%.
InMail Response Rate: Similarly, track how many of your InMails receive responses. This metric is crucial in assessing whether your messaging is engaging enough.
Analyze Messaging Patterns: If you notice that certain types of InMails receive more responses, take note. Use those successful messages as templates for future outreach.
I remember when I first started tracking these metrics. By tweaking my connection requests based on feedback and acceptance rates, I was able to increase my acceptance rate to around 75%. This directly contributed to a higher volume of meaningful conversations.
Measuring Social Selling Index (SSI) Score
Social Selling Index (SSI) is a powerful metric that LinkedIn uses to measure your effectiveness in leveraging the platform for social selling. It’s incredibly valuable for understanding your position in your industry and optimizing your sales efforts. The SSI is based on four key components:
- Establishing Your Professional Brand: This looks at how well your profile communicates your expertise and how often you’re sharing relevant content.
- Finding the Right People: Your ability to identify and connect with the right prospects is assessed here. This encompasses your use of filters and searches to target the right audience.
- Engaging with Insights: This measures how well you interact with content shared by others in your network or within your industry. Engagement can enhance your visibility and reputation.
- Building Relationships: The score considers how well you nurture your connections, indicating a strong network of relationships based on mutual interests.
Your SSI score can range from 0 to 100, with a higher score indicating a more effective use of LinkedIn for sales. Aim to keep improving on these four components to enhance your score over time.
For me, viewing my SSI score motivated me to engage more actively with my network. I realized that not only was it crucial to connect, but also to participate in discussions and share valuable insights that demonstrated my expertise.
Utilizing Sales Navigator Reporting Tools
The reporting tools within Sales Navigator provide detailed insights into your performance, allowing for data-driven decisions. Here’s how you can make the most out of these reporting tools:
- Dashboard Overview: Utilize the Sales Navigator dashboard to gain a comprehensive view of your activities, including a summary of your sales activities, the number of leads engaged, and your performance against set goals.
- Lead and Account Insights: Access detailed insights about your saved leads and accounts. This includes metrics on their activity within LinkedIn, which can inform your next steps in outreach or engagement strategies.
- Exporting Reports: If you need detailed data analysis, consider exporting reports on your activities and leads. This feature allows you to manipulate the data further to identify trends or patterns.
- Iterate Based on Results: Use the data from your reporting tools to adjust your strategies. Are certain types of leads converting more than others? Are you succeeding with specific outreach methods? Adjust your approach based on these insights.
When my team began using the reporting tools diligently, we identified a pattern where certain industries engaged more than others. This allowed us to refocus our efforts towards more promising sectors, leading to improved conversion rates.
In conclusion, analyzing performance and metrics within the LinkedIn Sales Navigator environment is crucial to refining your sales strategy. By tracking your InMail and connection request acceptance rates, measuring your SSI score, and utilizing the reporting tools, you equip yourself with the necessary insights to optimize your outreach efforts. Embracing this analytical approach will ultimately drive greater success in your sales endeavors.
Best Practices for Success on LinkedIn Sales Navigator
Now that you’ve developed a strong understanding of how to analyze performance and metrics, it’s essential to look at the best practices for achieving success on LinkedIn Sales Navigator. This platform can be a game-changer for your sales strategy, but like any tool, its effectiveness depends on how you utilize it. In this section, we’ll discuss the importance of consistent networking and engagement, personalizing outreach and communication, and staying updated with the latest features.
Consistent Networking and Engagement
One of the most valuable aspects of LinkedIn Sales Navigator is its capability to foster genuine networking and engagement with your leads. Here’s how to ensure you’re making the most out of this feature:
- Daily Engagement: Make it a habit to log in daily to check for updates and engage with your connections. Regularly liking, commenting, and sharing relevant posts will keep you visible and can lead to meaningful conversations.
- Join Relevant Groups: Participate in industry-specific LinkedIn groups. This not only expands your network but also positions you as a knowledgeable contributor in your field.
- Follow Up on Activities: Utilize the updates provided by Sales Navigator to reach out to leads after significant events, like job changes or promotions. This can open doors to new conversations.
- Set Networking Goals: Aim for specific networking goals, like adding a certain number of connections each week or engaging with particular leads. This can keep you focused and driven.
When I adopted a consistent engagement strategy, I noticed a significant uptick in my connection requests. Being present and involved in conversations made prospects more comfortable reaching out, leading to increased opportunities.
Personalizing Outreach and Communication
Personalization is key to effective outreach and communication on LinkedIn Sales Navigator. Generic messages can leave prospects feeling unvalued. Instead, here are best practices for crafting personalized communications:
- Research Before Reaching Out: Take a moment to look at a prospect’s profile and recent activities before sending them a connection request or InMail. Look for specific details that you can reference in your message.
- Tailor Your Messaging: Craft your outreach messages to address the individual needs and interests of the prospect. If they recently shared an article about industry trends, mention it and share your thoughts on the topic.
- Use Their Name: Always address your prospects by name. It might seem simple, but personalizing your greeting can create a more genuine connection.
- Focus on Value: Ensure your outreach emphasizes what you can offer them. Instead of leading with your pitch, share how your solution can address their pain points or challenges.
For instance, I once reached out to a lead who had recently shared a post about expanding their marketing efforts. I referenced their post in my message and offered insights tailored to their initiative. This personalized approach resulted in a productive conversation and opened the doors to collaboration.
Staying Updated with LinkedIn Sales Navigator Features
LinkedIn continually evolves, and staying updated with new features can set you apart from the competition. Here’s how to keep your skills current:
- Participate in Training Sessions: LinkedIn frequently offers webinars and training sessions to help users maximize the platform’s features. Take advantage of these opportunities to learn from experts.
- Engage with Educational Content: Follow LinkedIn’s official pages and industry-specific thought leaders to stay informed on updates, tips, and best practices. This will not only improve your skills but also keep your strategies fresh.
- Experiment with New Tools: When new features roll out, don’t hesitate to experiment. Try integrating new tools into your strategy to see how they might enhance your outreach.
- Solicit Feedback: Connect with colleagues or peers who use Sales Navigator and exchange experiences. They might have discovered insights or features that you haven’t utilized yet.
I recall when LinkedIn introduced a new filtering option for search results. By quickly adapting my approach to include this feature, I was able to identify high-priority leads more efficiently, resulting in a quicker conversion rate.
In summary, thriving on LinkedIn Sales Navigator requires a commitment to consistent networking and engagement, personalization in your outreach, and an awareness of the latest platform developments. By integrating these best practices into your daily routine, you’ll not only enhance your sales efforts but also build strong, lasting relationships with your prospects. Embracing these strategies will ultimately lead you to greater success in your sales journey.
[/et_pb_text][/et_pb_column][/et_pb_row][/et_pb_section]